Well it's been a year actually since we constructed and purchased chicks to raise for eggs. We have certainly gone through our trials and tribulations on the ownership of fowl. Suffice to say that after our neighbor's dog got through the fence and killed and took off with two of our Buff Orpington's, then our 3rd and final buffy drowned in the horse trough we learned a lot and was lucky enough to purchase 8 fully grown laying hens from a friend. They are all doing very well and enjoying life with more space and less chickens to deal with as they came from a flock of around 50.
This post is to tell you, and show you, how we built our coop. We are quite proud of it and it's well-built and standing up to the weather very well and accomplishing what we set out to do with it.
We have built shelters for the alpacas, put up hay barns, all with the use of the portable garages that can be purchased at places like Tractor Supply. We were very lucky in the fact that we were able to buy these kits at the "end" of the season (a season for garages???) for a mere $100 each. We took total advantage of this good find!
Before I knew about these large 12 X 20' structures I was sent to the store for a tarp and thought that the $79 tent structure would work well for a small hay barn. Well Jerry didn't think so and we didn't use it. This
is a smaller, lighter version of the garage and I believe it measures something like 10 X 12', quite a generous size.
So then we decided to buy peacock chicks from our neighbor and needed a home for them especially until they were fully grown. I happened to remember the tent structure and asked why not build our coop around that? This was approved and we started. I knew I wanted to place it in an area not too far from the house, protected by trees and safe from too much alpaca nosy-ness!
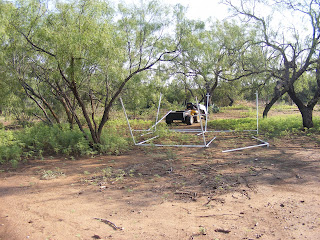
Pic 1: This is the first stage,
putting the poles together. I think this is the worst part of the construction because as you add one pole, another falls off. We actually screw the poles together on two sides with metal self-tapping screws to make them more stable. Every pole, every junction, anywhere there is a join you place screws. These poles were all concreted into the ground about 10-12" for security.
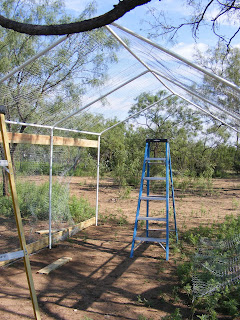
Pic 2: We screwed on 2X4's for purloins to make the framework more stable. Chicken wire went over the whole roof and down the sides. That is a 6' ladder in the pic.
Pic 3 (below): We went to a metal building supplier and bought their 2nds for $10 per panel. They are white on the inside so it looks quite consistent on the inside that shows. Because I wanted the coop to look like the alpaca shelters we did purchase sand colored panels for the sides and front.

We added shade cloth on the front half of the roof for extra protection from our hot Texas sun. Side panels are now in place, screwed on to the poles & purloins, again with the metal screws.

Pic 4: Another view of the sun shade. It wasn't wide enough for one run & we had enough for two runs which was just enough as we covered the end third of the roof with metal for shelter from the elements.

Pic 5: The peaks were cut to match the frame in front and back and now all we have to do is build the door. Oh, and we placed a cage inside that was here on the farm when we moved in. Thought they could use it to perch on top and the inside to cuddle together in the cold nights. One thing we didn't take into consideration. . . the cage is larger than the door opening!! Oh well, they do roost on it and lay their eggs inside it.
Door is built and we're pretty m

uch finished. We did add some metal screen on the base around the front and sides to protect from predators which we put on with cable ties.
Pic 7 (left): Here's the colorful back side of the coop. These are the $10 panels that we purchased, no choice of color you get what you get. At least it the Texas flag colors. I have toyed with the idea of painting a star on the red but no-one sees it as it faces the back of our property.
NOTE: We did lay concrete pavers all around the outside of the coop to prevent predators from digging their way in.
Update: We currently have four guinea fowl (lost 4 to predators when we were out of town for a week) an assortment of 8 chickens. They all live together quite well. The male guineas are a little territorial but the chickens deal with it. Our lone peacock who loved his "flock" disappeared a month ago during mating season. We suspect that he is penned up over at our neighbors with theirs. Since they are new owners they probably thought he was one of theirs that came back! Maybe he'll return one day, we "lost" him for 2 months before.
We did pen in an area for the chickens and guineas just so the alpacas did not encroach on their area. The guineas will fly over the fence but come back in the evenings to roost. The male guineas roost in the tree by the coop but the girls go in with the chickens.
We get 8-9 eggs per day from all. They all lay in the same nest within the cage. Oh and we purchased wood shavings and laid about 3 inches on the floor of the coop. It's really good as far as not having the chickens walking in their poop, plus cleanup is only needed about every 6-9 months. It is funny when we rake out the dirty shavings and replace it as the chickens are afraid to walk on the clean new stuff. It doesn't take them long to figure it out!
Chickens are wonderful birds and very nice to have around. I think some of the breeds are just as nice as cats. . . and we really love cats!
I'm having a heck of a time trying to upload more pics so I'll post the current view of the coop tomorrow.
 Here's the girls, they ran out of the coop to greet me when I went to take these pics.
 Today's pic of the coop. We now have a perch inside but I've rarely ever seen them on it. Note at the back left there's a black square. That's a door that Jerry cut out of the hog panel. It's tied on with cable ties and we "lock" it up in the daytime with a caribener so the guineas can come and go. Even though they fly out of the pen area they can never figure out how to get back in and they go running around and around the outside of the pen wondering how to get back in. Now with their front and back "trap doors" they come and go. These chickens have not have that privilege until this week. We wanted them to get used to the farm and their area. Most of them seem quite content to stay in their yard but last night a few wandered out to the back area, not too far.
 The back of the coop is where the back fence is for them so they have a good sized area to roam.
 There are a good amount of trees that provide both perches and shade.
 I painted this chicken years ago, not knowing I'd be owning some real ones! We just screwed it onto the front of the coop. It's kinda rustic version of a chicken.


